Form
p5.js tries to make it as easy as possible to express your ideas using code. There are many built in functions to draw shapes, text, images and more to the canvas. This article will give you a starting point for drawing with primitive shapes.
Drawing Order
Drawing in p5.js happens sequentially. The order within the setup or
draw function matters. The last call to a drawing function draws over
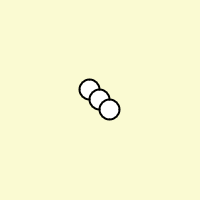
the previous ones. In the sketch below you see three ellipses drawn to
the canvas. The ellipses is drawn by setting a position as x and y coordinate and then setting the width and
height. The parameters are passed to the ellipses function
in that order separated by commas. Before the ellipses are drawn the
canvas is filled with a light yellow color. We will learn more about the background and other color functions later. We also only use the setup function here. The draw function is empty. If you read our
article “Anatomy of a Sketch” you might remember that the setup function is called once
when the sketch starts. This means this is a static image and the program
ends with the last call to the ellipse function.
function setup() {
		background("lightgoldenrodyellow");
		// ellipse (x, y, width, height)
		ellipse(45, 45, 10, 10);
		ellipse(50, 50, 10, 10);
		ellipse(55, 55, 10, 10);
	}
	function draw() {}
2D Shapes
In p5.js we can make use of many shapes for drawing something to the canvas. These shapes can be devided into four categories.
- Geometric shapes
- Freeform shapes
- Curve shapes
- Vertex shapes
As the the geometric shapes we have: rect, square, arc, circle and point. The freeform shapes are: quad, triangle and
line. The geometric shapes have a similar set of
parameters. It is allways a position as x and y coordinate and then parameters like width and height or radius for example. At the end of this article you will find a list
links to the p5.js reference where you can read more about the parameters.
The curve shapes and vertex shapes are more complex and will be discussed later.
Stroke and Fill
All of these shapes are affected by thestroke, strokeWeight, noStroke, fill and noFill functions.
Except for the point shape. It has no fill as a
point has no area. The functions stroke and fill take a color as a parameter. For simplicity we currently only use named
colors. We will dive into colors later on. Find and bookmark some nice named
colors at colornames.inpyjamas.dev. The functions noStroke and noFill are used to
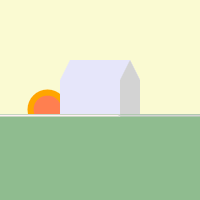
remove the stroke or fill from a shape. With the strokeWeight function we can set the width of the stroke. Below you see some sample
code that draws different shapes with different settings.
function setup() {
		createCanvas(100, 100);
		background('lightgoldenrodyellow');
		// sun
		strokeWeight(3);
		stroke('orange');
		fill('coral');
		circle(24, 55, 17);
		noStroke();
		// house
		stroke('lavenderblush');
		strokeWeight(1);
		line(0, 57, 100, 57);
		noStroke();
		fill('lavender');
		rect(30, 40, 40, 17);
		//roof
		quad(35, 30, 65, 30, 70, 40, 30, 40);
		// land
		noStroke();
		fill('darkseagreen');
		rect(0, 57, 100, 43);
	}
	function draw() {}
Drawing Modes
The geometric shapes are mostly drawn based on one x/y position on the
canvas (see also our article about “The Coordinate System”) and then altered by using parameters like their width or height
(except for the CORNERS mode). These shapes all have a acompaning
mode control function that allows us to draw them in different ways.
Calls to the rectMode and ellipseMode functions
are made before the drawing functions. Also the passed parameters ( CORNER CENTER RADIUS CORNERS) are constants provided by p5.js. They are written
in uppercase and without quotes.
| Control function | Possible modes | Affected shapes | Docs |
|---|---|---|---|
rectMode | CORNER CENTER RADIUS CORNERS | rect square | rectMode |
ellipseMode | CORNER CENTER RADIUS CORNERS | ellipse arc circle | ellipseMode |
rectMode
Below you see the different modes applied to the same rect and
ellipse. For brevity we only show the drawing calls here
and omit the calls to setup or draw.

rectMode(CENTER);
	rect(50, 50, 10, 10);
rectMode(CORNER);
	rect(50, 50, 10, 10);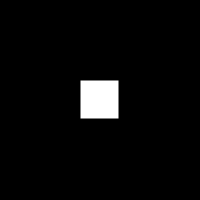
rectMode(RADIUS);
	rect(50, 50, 10, 10);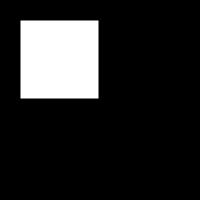
rectMode(CORNERS);
	rect(50, 50, 10, 10);
ellipseMode

ellipseMode(CENTER);
	ellipse(50, 50, 10, 10);
ellipseMode(CORNER);
	ellipse(50, 50, 10, 10);
ellipseMode(RADIUS);
	ellipse(50, 50, 10, 10);
ellipseMode(CORNERS);
	ellipse(50, 50, 60, 60);
We had to change the second set of parameters for the ellipseMode(CORNERS) mode here, since drawing the ellipse with values smaller then the first
pair throws an error. This 🐛 will be fixed in version 1.11.1 or higher. At the time of writing this
article the latest version is 1.11.0.
Sketch
In the sketch above you see nearly all the drawing functions used with
paramters we discussed in this article.
point circle, arc, rect, square, triangle, line, quad. We also
make use of ellipseMode and rectMode to draw the
shapes in different ways. There are calls to stroke and fill to set the stroke and fill color. There is also the call to the radians function to convert angles from degrees to radians.
functions in p5.js that use angles accept the angle in radians by
default. If you need to convert degrees to radians you can use the radians function. Or you can use the angleMode function to set the
mode to degrees. There is also the degrees function to convert
radians to degrees.
Tasks
Clone this sketch with the button below and play with the different drawing functions.
- Try to create variables for the hardcoded values and pass them as parameters to the drawing functions.
- Reuse the variables for the drawing functions to make it easier to change the position and size of the shapes.
- Use your own colors and stroke weights.
- Try to draw a house with a door and a window.
-
Change the
angleModeto degrees to remove that nasty calls toradians. -
Lookup the
vertex,curveandcurveVertexfunctions and try to draw more complex shapes.